
Experiment 7-103d: Atomic Emission Spectroscopy
Extra Report Sheets for Experiment 7 (pdf format)
![]() Introduction
Introduction
Long before the modern picture of the atom emerged, scientists knew that every atom, when subjected to high temperatures or an electric discharge, would emit light of specific, characteristic wavelengths. The collection of all the emitted wavelengths is called the emission spectrum and is sometimes referred to as the “line” spectrum because of how they are (or used to be) measured.
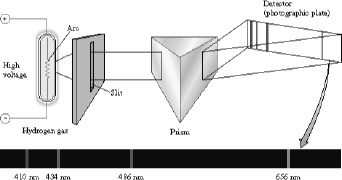
Figure 1. Collection of the atomic emission spectra of hydrogen
The lines in figure 1 correspond to some of the emission lines in atomic hydrogen – the Balmer series. These lines are named for the amateur Swiss scientist (Johann Balmer) who in 1885 discovered that the frequency of these lines is directly proportional to 1/n2 (for integers n=2,3,4..). Figure 2 shows that the Balmer series (the lines that happen to be in visible part of the spectrum) are the set of transitions that end up in the n=2 state (which explains why Balmer’s n’s had to be greater than 2).
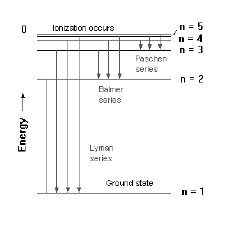
Figure 2: Energy level for the first five levels of the hydrogen atom. The set of transitions that end in the n=2 state are called the Balmer series.
Later, Johannes Rydberg accounted for all the lines in the hydrogen emission spectrum by generalizing the Balmer formula to:
![]()
The ni and nf represent the initial and final states of the atom and must be integers greater than or equal to one. The number, 2.178x10⁻¹⁸ J, is called the Rydberg constant (RH), and we will experimentally verify its value (among other things) in this lab.
Methodology
You will construct a simple monochromator that will allow you to measure the wavelength of atomic emission with remarkable accuracy given very simple materials. After you construct your monochromator, you will calibrate it using known wavelengths of sharp emission lines (in our case we will use the Hg and He emission spectra). Once your monochromator is calibrated you will measure the Balmer Series of lines of the hydrogen atom. Using this data, a few calculations, and a couple of graphs, you will be able to verify the Rydberg constant.
![]() Experimental
Experimental
Construction of the Monochromator
You will work in pairs for this experiment. Follow the instructions in your laboratory manual to construct your monochromator. The materials will be provided in lab. Your lab instructor and your TA's will be there to help you but each pair of students must construct their own monochromator (figure 3 is an illustration of the device that you will construct). It's really not that hard.
Remember, any lab that you get to use duct tape must be fun!!!
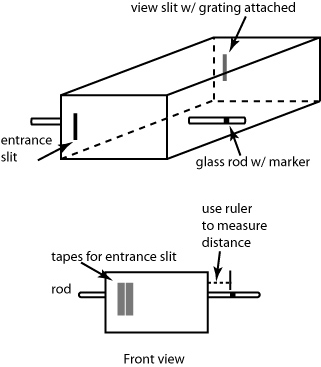
Figure 3: Schematic diagram of the monochromator
Once you've constructed your monochromator, you are ready to go. To practice, hold the monochromator in two hands, look into the box through the viewing hole (opposite the slit), and aim the slit at a source of light. A fluorescent light provides both a continuous spectrum from the phosphor coating on the glass tube and also two sharp lines from Hg vapor. One line is green, the other is violet. The spectrum is a rainbow of colors that appear at the left side of the box (if your viewing hole is on the right). Make sure that the whole visible spectrum from violet (400 nm) to red (700 nm) appears from right to left within your box. The calibration glass rod should appear to pass through the spectrum.
Calibration of the monochromator:
To measure accurate wavelengths, we must calibrate the monochromator using known wavelengths of sharp emission lines.
The scratch in the sliding glass rod (see instructions in your lab manual) allows you to measure line positions on a length scale. The rod acts as a "light pipe". Light from the room enters the rod through its ends, travels along the rod, and scatters from the scratch, allowing your eye to see the scratch in an otherwise dark box.
Setting a reference mark.
You''ll need to set a reference mark. To do this, you will slide the glass rod so the scratch lines up with the extreme blue end of the spectrum. You should a narrow piece of tape around the glass rod on its left end, leaving about 1” between the edge of the box and the marker tape.
Measuring the position of the green and violet lines Hg lines:
Look at the fluorescent light again and locate the two sharp lines from Hg vapor. Carefully center the scratch on the green line. Without moving the rod, measure the distance between the edge of the box and the marker tape with a mm scale ruler. Do the same for the violet line. These two points can be used for your calibration curve. The accurate wavelengths of the Hg lines are: 546.0 nm (green) and 435.8 nm (violet).
Measuring the position of the He lines:
To get more calibration points, look at the He emission lamp. Excited states of He that are present in the lamp emit at six convenient wavelengths in the visible region of the spectrum:
|
Color
|
Wavelength (nm)
|
|
red
|
668.0
|
|
orange
|
587.8
|
|
green
|
501.7
|
|
green
|
492.4
|
|
blue
|
471.5
|
|
violet
|
447.3
|
For each line, measure the position at least four times (each student should do at least 2 measurements) and note a qualitative intensity (s = strong, m = medium, w = weak). With practice you should be able to find all six lines, but the four most intense lines will suffice for your calibration curve.
Measurement of the Balmer Series Lines of the Hydrogen Atom.
There are three visible lines in the H atom emission spectrum. Look at the H emission lamps and measure the emission line positions and note their intensities. Repeat your measurements until reproducible results are obtained (You should have at least four measurements for each visible line – at least two per student).
![]() Calculations:
Calculations:
Construction of the Calibration Curve:
Plot the given wavelengths vs the measured distances for your Hg and He data to construct the calibration curve. The plot should look quite smooth and almost linear (see figure 4). The smoothness of the plot gives an indication of the accuracy of the wavelengths that you will now measure. You can use the computers in the lab to generate your plot using MS Excel. You should also find the equation for the best-fit line of your data (i.e. find the slope and y-intercept of the line).
Graphing with Excel: (pdf format)
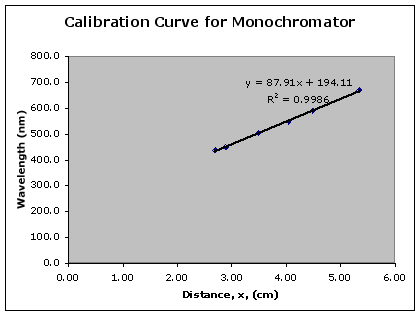
Figure 4: An example of a calibration curve for the monochromator
Using the equation of the best-fit line from the calibration curve of your monochromator, find the wavelengths that corresponds to each visible line in the H atom emission spectrum. Once you have found these wavelengths, you must submit them to your lab instructor. The data for each group in your lab section will be collected and this data and instructions on the statistical analysis of this data will be available on Blackboard within 48 hours. You should complete the statistical analysis in your notebook and hand in the yellow sheets next week with your lab report sheet.
Verification of the Rydberg constant (RH):
Using the wavelengths that corresponds to each visible line in the H atom emission spectrum.
Calculate the DE that corresponds to each l. Remember, E = hc/l, where h is Planck’s constant and c is the speed of light.
The energy levels of the hydrogen atom are given by:
![]()
Using the equation above to calculate the difference between two levels, we get:
![]()
where ni and nf are the initial and final values of n, respectively. The minus sign in front of D E indicates that energy is flowing out of the system (emission). For the Balmer series, the final state is always n = 2, so the equation can be written:
![]()
where C is a constant. Notice that this equation looks suspiciously like the equation for a straight line.
Devise a linear plot that uses your data from the H emisision spectra to estimate RH (i.e. plot DE vs 1/n2 and find the best fit line). The slope of your line corresponds to the Rydberg constant, RH.
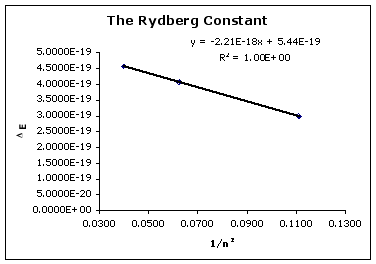
Figure 5: Plot of DE vs 1/n2
Summary of Calculations that are due with your lab report.
Perform the confidence limit analysis and following calculations. Your calculations and analysis should be done in your notebook and the yellow sheets should be handed in with the Laboratory Report sheets.
1. Using your lab section data, calculate the 95% confidence limit range (e.g. 660.8 ± 5.4 nm) for each of the wavelengths for Balmer series (you can find your lab section data on Blackboard).
2. Using only your data, calculate the DE that corresponds to each of the l for the Balmer Series.
3. Finally, you should compare your result with the known value (2.178x10⁻¹⁸ J). Calculate the % difference between your estimated value and the literature value of RH